
This weekend, I was hacking away on a comments system for my SaaS app Lean Steps, and about half-way through I realized that it would make a great blog post. So, here we are!
In this first post, we'll start our comments system by building a Vue.js component. Then in the next few installments, we can style it with Tailwind CSS and wire it up to a Laravel backend to persist our comments.
Let's dive right in and get to work!
The Set Up
We'll be using Laravel for our backend, so we can start by setting up a new Laravel project. To do that we can navigate to where we want to store our project in our terminal and then run laravel new comments (feel free to call the project whatever you'd like).
Once our project is done installing, we'll need to update some of the .env variables. Opening up our project, we can see the .env file in the root of our project. Inside we'll update the APP_NAME and APP_URL to "Comments Demo" and "http://comments.test" respectively.
In case you were wondering, I'm getting that URL from Laravel Valet. If you're interested in getting set up with that, check out their docs here.
Now we can update our database details. I have a generic demo database set up that I use for all of my quick projects. I think it's nice because I don't have to spin up a new database for each project.
If you don't already have one set up, you can run mysql -uroot -p to sign into MySQL and then run create database <database-name>; to create a new database.
With that setup, in our .env we can update our DB_DATABASE to match our database name. Our DB_USERNAME can be set to root, and we can leave our DB_PASSWORD blank.
We'll be using Laravel's default authentication scaffolding so we can record which users left comments. So, we'll scaffold that by running php artisan make:auth.
Now, we're ready to migrate our database. To do that, we'll run php artisan migrate from the command line.
Onto our JavaScript build, we'll initialize all of our dependencies by running yarn. Then we can add in Tailwind CSS by following the installation instructions provided in their docs.
Finally, we'll initialize our git repository and commit all of this set up by running git init, git add ., and git commit -m "initial commit".
That'll get us up and running for this project. Now let's start building our comments component.
Scaffolding The Component
We can start building our comments component by running npm run watch so our JavaScript changes get compiled as we work. Next, we'll hop into our home.blade.php file and clear out the existing code between the @section() tags, so we have some room to add our comments.
In our browser, we can quickly run through the register flow to create an account so that we can see the home.blade.php template in action. With everything cleared out we should see this:

With that setup, we can head over to our resources/asset/js/components directory and add a new Vue file called CommentsManager.vue. Inside of there, we'll scaffold it out with the following:
<template>
    <div>
        <h1>Hello World</h1>
    </div>
</template>

<script>
    export default {
        data: function() {
            return {

          }
        },
    }
</script>
Nice! Now, we can register our CommentsManager component in our app.js file like so:
Vue.component('comments-manager', require('./components/CommentsManager.vue'));
Finally, we can add our component to the home.blade.php file so we can see it in our browser. To do that, we'll add the component in between the @section() tags like this:
@extends('layouts.app')

@section('content')
    <comments-manager></comments-manager>
@endsection
Back in our browser, we can now see that our component is being rendered.
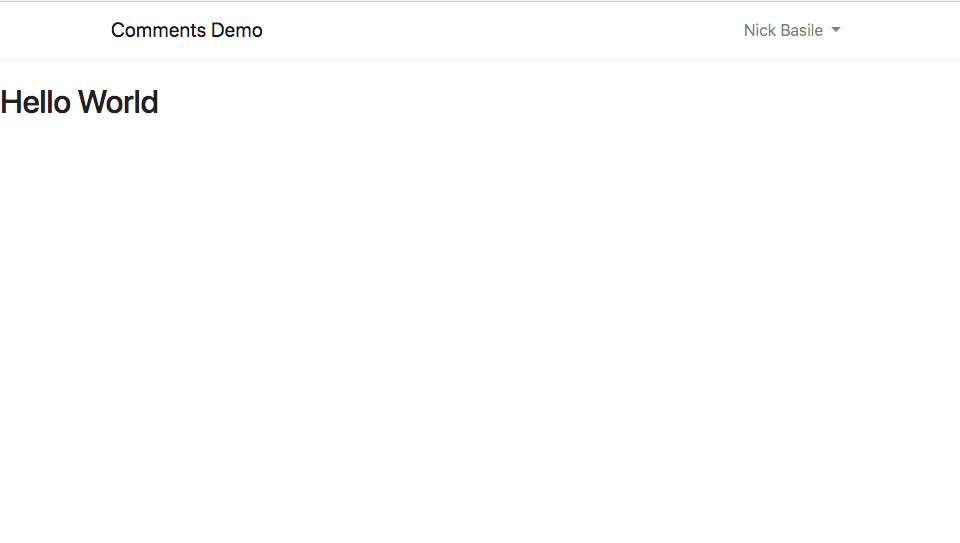
Not the prettiest UI just yet, but we'll get there!
Showing Comments
With that all set up, let's start showing some comments. Inside of our CommentsManager's data property, we can add an Array for comments. Inside, we'll add a basic comment with some details we're going to need.
data: function() {
    return {
        comments: [
            {
                id: 1,
                body: "How's it going?",
                edited: false,
                created_at: new Date().toLocaleString(),
                author: {
                    id: 1,
                    name: 'Nick Basile',
                }
            }
        ]
    }
},
Now that we have some data to work with we can start showing it on the page. At this point, we have a choice to make. While we could keep all of our logic contained within the CommentsManager component, we'd end up having to write some weird methods to parse each comment's details. So, let's make another component for each comment.
In the same directory as CommentsManager, we can create a new Vue file called CommentItem. We can scaffold it the same way as CommentsManager.
<template>
    <div>

    </div>
</template>

<script>
    export default {
        data: function() {
            return {

          }
        },
    }
</script>
Now, let's pass through a comment prop with all of the comment's data and then add it to the template.
<template>
    <div>
        <div>
            <p>{{comment.body}}</p>
        </div>
        <div>
            <p>{{comment.author.full_name}} <span>•</span>{{ comment.created_at}}</p>
        </div>
    </div>
</template>

<script>
    export default {
        props: {
            comment: {
                required: true,
                type: Object,
            }
        },
        data: function() {
            return {

          }
        },
    }
</script>
With our component in place, we can register it in our CommentsManager and start showing the comments. Right below our opening script tag, we can import our CommentItem. Then we can add a components property to CommentsManager and register our CommentItem. To wrap this up, we'll add our comment to the template, add a v-for and :key directives, and add our comment prop.
<template>
    <div>
        <div>
            <comment v-for="comment in comments"
                     :key="comment.id"
                     :comment="comment">
            </comment>
        </div>
    </div>
</template>

<script>
    import comment from './CommentItem'
    export default {
        components: {
            comment
        },
        data: function() {
            return {
                comments: [
                    {
                        id: 1,
                        body: "How's it going?",
                        edited: false,
                        created_at: new Date().toLocaleString(),
                        author: {
                            id: 1,
                            name: 'Nick Basile',
                        }
                    }
                ]
          }
        },
    }
</script>
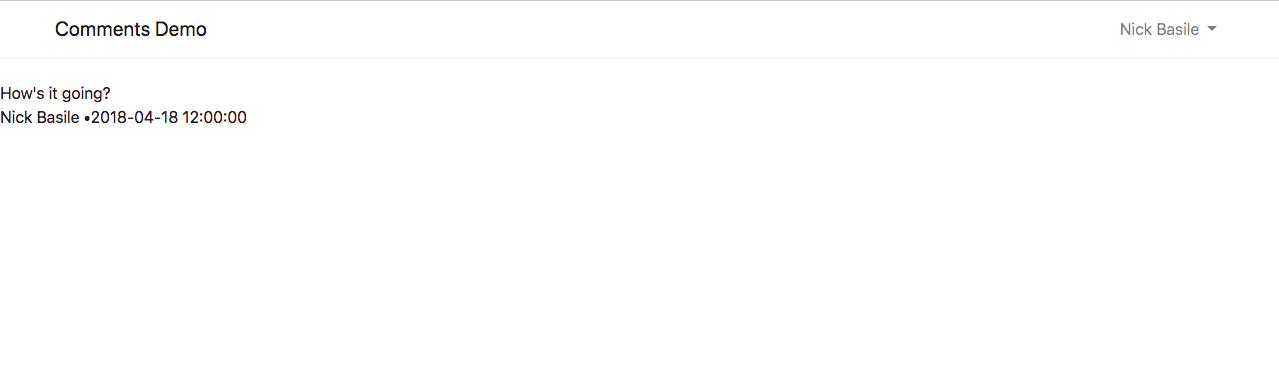
Now our page is starting to come to life.
Let's keep working on out CommentItem component and add the ability to edit a comment.
Editing a Comment
As we build the edit functionality, it's important to remember that we don't want to let just anybody edit a comment. We only want the author to edit it. To make that happen, we'll need to pass the current user to our CommentItem.
For that, we'll need to add a user prop to both our components and then add pass through the authenticated user. We can go ahead and add that prop like this;
//CommentsManager
<comment v-for="comment in comments"
         :key="comment.id"
         :user="user"
         :comment="comment">
</comment>
...
props: {
    user: {
        required: true,
        type: Object,
    }
},

//CommentItem
props: {
    user: {
        required: true,
        type: Object,
    },
    comment: {
        required: true,
        type: Object,
    }
},

//home.blade.php
<comments-manager :user="{{ auth()->user() }}"></comments-manager>
Now in our CommentItem, we can add a computed property to check if the current user can edit this comment.
computed: {
    editable() {
        return this.user.id === this.comment.author.id;
    }
}
It's a pretty simple check, but having it in a computed property will make our template much more readable.
Now we can add an edit button for our comment author. Right below our comment.body, we can add the button.
<div>
    <p>{{comment.body}}</p>
    <button v-if="editable">Edit</button>
</div>
With that v-if in place, we can be sure that only the author will be able to click that button. Let's add another comment now so we can see both states in action. So in the CommentsManager inside of comments, we can add another Object.
comments: [
    {
        id: 1,
        body: "How's it going?",
        edited: false,
        created_at: new Date().toLocaleString(),
        author: {
            id: 1,
            name: 'Nick Basile',
        }
    },
    {
        id: 2,
        body: "Pretty good. Just making a painting.",
        edited: false,
        created_at: new Date().toLocaleString(),
        author: {
            id: 2,
            name: 'Bob Ross',
        }
    }
]
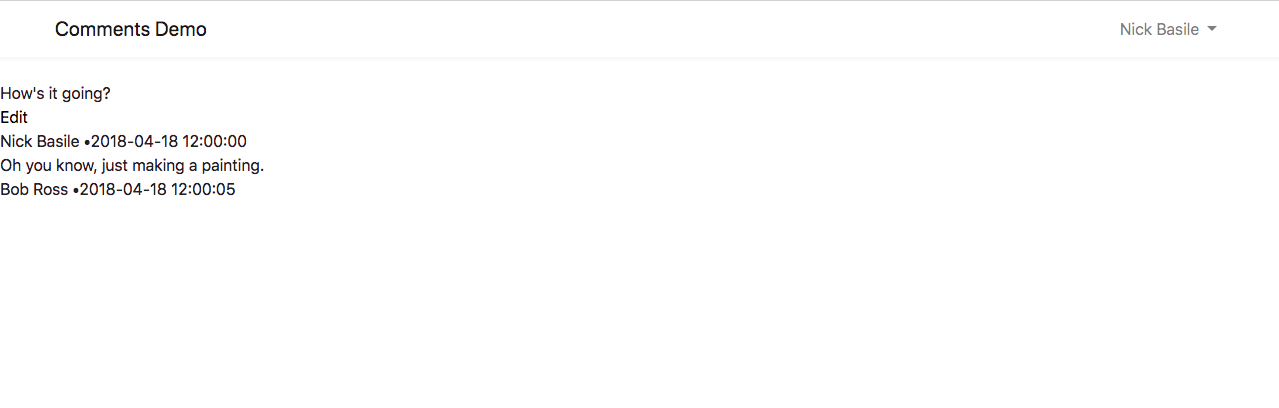
Looking at our page, we can see that we can't edit Bob's comment because we're not the author of it.
That's pretty awesome. Now, let's get to work editing our comment.
We'll start by adding a state property to our CommentItem's component's data so we can keep track of when we're editing. Let's also add a updatedComment property so we can keep track of our changes.
data: function() {
    return {
        state: 'default',
        data: {
            body: this.comment.body,
        }
  }
},
Since this is a pretty simple state, I'll go ahead and use a String. But, feel free to use a Boolean if you'd like. For a more in-depth look at when to use which, check out my previous blog post about it.
Initializing our data.body with the value from the comment.body allows us to populate our edit form with the correct initial data.
Now, we'll need wire up our edit button to toggle the state. We can simply bind a click event that sets the state to editing.
<button v-if="editable" @click="state = 'editing'">Edit</button>
With that hooked up, let's add in our edit form and make sure we're toggling our read and edit states.
<template>
    <div>
        <div v-show="state === 'default'">
            <div>
                <p>{{comment.body}}</p>
                <button v-if="editable" @click="state = 'editing'">Edit</button>
            </div>
            <div>
                <p>{{comment.author.full_name}} <span>•</span>{{ comment.created_at}}</p>
            </div>
        </div>
        <div v-show="state === 'editing'">
            <div>
                <h3>Update Comment</h3>
            </div>
            <textarea v-model="data.body"
                      placeholder="Update comment"
                      class="border">
            </textarea>
            <div>
                <button>Update</button>
                <button>Cancel</button>
            </div>
        </div>
    </div>
</template>
Everything here is pretty straight-forward. We have two divs that we toggle when the state changes. The first div has our read state from earlier, while the second contains a textarea and some buttons. Let's wire up the cancel button first so we can toggle the editing state.
We can add a method called resetEdit that will toggle the state and reset the data.body information. Then we'll bind that to our cancel button.
//Template
<button @click="resetEdit">Cancel</button>
...

//Vue Instance
methods: {
    resetEdit() {
        this.state = 'default';
        this.data.body = this.comment.body;
    }
}
Now we can make all the changes we want and leave before saving them.
Let's continue by persisting our edits. We'll make another method and call it saveEdit(). We can then bind that to our save button.
Here we have a couple of choices for bubbling our changes back up to the parent component where comments live. We could use $parent.comments to access them directly, or we could directly change our comment prop. These aren't the best options though, because they tightly couple our components together. That isn't always the worst thing in the world, but let's use events for a more "proper" approach.
In our saveEdit method, we'll set the state back to its default value, and we'll $emit a comment-updated event with the data we'll need to make this edit. Then in our CommentsManager, we'll have an updateComment method that will get called when our event fires.
//CommentItem

//Template
<button @click="saveEdit">Update</button>

//Script
saveEdit() {
    this.state = 'default';

    this.$emit('comment-updated', {
        'id': this.comment.id,
        'body': this.data.body,
    });
}

//CommentsManager

//Template
<comment v-for="comment in comments"
         :key="comment.id"
         :user="user"
         :comment="comment"
         @comment-updated="updateComment($event)">
</comment>

//Script
methods: {
    updateComment($event) {
        let index = this.comments.findIndex((element) => {
            return element.id === $event.id;
        });

        this.comments[index].body = $event.body;
    }
}
Hopping into our browser, we can see that our comment is getting updated now.
Deleting a Comment
With this same approach, we can also add the functionality to delete a comment. Let's add a delete button to our template and wire up an event.
//CommentItem

//Template
<div>
    <button @click="saveEdit">Update</button>
    <button @click="resetEdit">Cancel</button>
    <button @click="deleteComment">Delete</button>
</div>

//Script
deleteComment() {
    this.$emit('comment-deleted', {
        'id': this.comment.id,
    });
}

//Comments Manager

//Template
<comment v-for="comment in comments"
         :key="comment.id"
         :user="user"
         :comment="comment"
         @comment-updated="updateComment($event)"
         @comment-deleted="deleteComment($event)">
</comment>

//Script
deleteComment($event) {
    let index = this.comments.findIndex((element) => {
        return element.id === $event.id;
    });

    this.comments.splice(index, 1);
}
Once we get the hang of using events to manipulate data, it gets pretty easy to build functionality like this. Now that we can edit and delete our comments let's add a form for adding new comments.
Adding Comments
If you've been keeping score at home, we're down to our final CRUD action: creating new comments. We'll keep things simple and add a form directly to our CommentsManager.
Right above our comment v-for we can add a simple form that looks a look like our edit form.
<template>
    <div>
        <div>
            <div>
                <h2>Comments</h2>
            </div>
            <textarea placeholder="Add a comment"
                          class="border">
              </textarea>
            <div>
                <button>Save</button>
                <button>Cancel</button>
            </div>
        </div>
        <div>
            <comment v-for="comment in comments"
                     :key="comment.id"
                     :user="user"
                     :comment="comment"
                     @comment-updated="updateComment($event)"
                     @comment-deleted="deleteComment($event)">
            </comment>
        </div>
    </div>
</template>
To start adding new offers, we'll need to add a saveComment method, add a data.body property to our data, and add a v-model to our textarea.
//Template
 <div>
    <div>
        <h2>Comments</h2>
    </div>
    <textarea v-model="data.body"
              placeholder="Add a comment"
              class="border">
    </textarea>
    <div>
        <button @click="saveComment">Save</button>
        <button>Cancel</button>
    </div>
</div>

//Script
saveComment() {
    let newComment = {
        id: this.comments[this.comments.length - 1].id + 1,
        body: this.data.body,
        edited: false,
        created_at: new Date().toLocaleString(),
        author: {
            id: this.user.id,
            name: this.user.name,
        }
    }

    this.comments.push(newComment);

    this.data.body = '';
}
Inside of saveComment we build up our newComment with the data from our form, our user, and elsewhere. Notably, we're not just setting the id to the length of the comments Array. This could lead to collisions in our key if we deleted the first comment and then tried to add another one. This approach guarantees that we won't have any collisions.
If we head on over to our browser, we can see that our saveComment method is working just like we'd expect.
The Wrap-Up
With our basic CRUD actions in place, our comments system is coming together! But, right now it's a little hard to look at. In the next post, we'll style everything nicely with Tailwind CSS.
If you'd like an overview of the components we built today, you can see them at on our GitHub repo here. As always, feel free to ask me any questions on Twitter. And until next time, happy coding!