
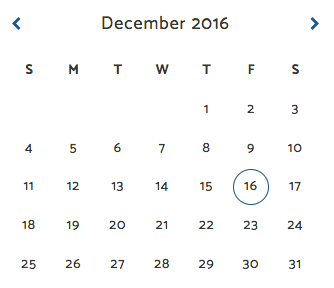
Last week, Patrick walked us through some high-level considerations to take into account when building a calendar. So this week, let's take a stab at implementing a calendar with Vue.js. Because there is so much that goes into building a calendar, we'll focus our efforts this week on creating a simple Vue component that can display a month of dates organized by the days of the week, toggle between different months, and show us what the current date is. Basically something like this:
Big Picture
Before we dive into the code, let's take a second to figure out what we'll need to do in order to build a working calendar. First, we'll need to figure out what the current date is, so we can initialize all of the other data. Then, we'll need to use the current date to figure out what the current month is, how many days it has, what the current year is, and the weekday that the first day of the month fell on. Next, we'll need a way to store our initial date values, so we can correctly mark our current date. Finally, we'll need a way to increment and decrement the month and have all of our data adjust to reflect the new context. Our checklist for development would look something like this:
- Find the current date
- Find the current month and year
- Determine the number of days in the month and the weekday that the first day of the month fell on
- Store the initial info for reference later
- Increment and decrement our month to change context
Somewhere out there, a project manager just got their wings.
Set Up
Since this is a JavaScript project that deals with dates, we'll be making heavy use of the fantastic Moment.js library. You can add it to your project with NPM by running npm install moment. Apart from that, we'll just be using a simple Vue component, called calendar.vue, that you can add to any project you like.
The Calendar
Task 1
Let's start this component by taking a look at our <script> section within our calendar.vue file. At the top, right before our export default, let's import Moment.js so we can use it in our component. Moving on to our export default, let's setup our component's data. Based on the requirements we outlined, we'll need something to store our initial date, the changing date context, and the days of the week. Putting that together, we'll end up with this:
data(){
    return{
        today: moment(),
        dateContext: moment(),
        days: ['S', 'M', 'T', 'W', 'T', 'F', 'S']
    }
},
As you can see, we're using moment() to set both today and dateContext to the current moment - pun very intended - and then we just have an array of days that will make our HTML a bit easier to read. This takes care of our first task, and when you check the component out in your Vue DevTools you'll see that everything is setup correctly.
Task 2
Now, let's find the current month and year to take care of our second task. From this point on, we'll be dealing with computed properties. So, let's set one up for month and another for year.
computed: {
    year: function () {

    },
    month: function () {

    }
}
Now we can use Moment.js to format our dateContext to give us the results we want.
computed: {
    year: function () {
        var t = this;
        return t.dateContext.format('Y');
    },
    month: function () {
        var t = this;
        return t.dateContext.format('MMMM');
    }
}
If you check your Vue DevTools now, you'll see that our computed properties are displaying the year and month for our dateContext. With task 2 taken care of, let's move on to number 3.
Task 3
For task 3, we'll continue to make use of our computed properties, so let's set up two properties called daysInMonth, currentDate and firstDayOfMonth.
computed: {
    //Previous Code Above
    daysInMonth: function () {

    },
    currentDate: function () {

    },
    firstDayOfMonth: function () {

    }
}
Once again, with Moment's help this will be pretty easy. For daysInMonth Moment has a method called daysInMonth() that we can use. With that taken care of, let's break down currentDate and firstDayOfMonth. We'll set up currentDate so it give us the actual integer date for our dateContext. Then we'll leverage this inside of firstDayOfMonth to find when the first day of the month was and determine its weekday.
computed: {
    //Previous Code Above
    daysInMonth: function () {
        var t = this;
        return t.dateContext.daysInMonth();
    },
    currentDate: function () {
        var t = this;
        return t.dateContext.get('date');
    },
    firstDayOfMonth: function () {
        var t = this;
        var firstDay = moment(t.dateContext).subtract((t.currentDate - 1), 'days');
        return firstDay.weekday();
    }
}
Look how simple Moment.js makes this! dayInMonth and currentDate are taken care of for us by Moment, so we can focus our attention on parsing out firstDayOfMonth. Inside, we have a variable called firstDay that subtracts the currentDate's number of days, minus 1, from the dateContext. We subtract an extra day from the currentDate because it includes the dateContext and we want to know the days preceding dateContext. Finally, Moment has a method that finds the weekday for us, so we'll return that to get the first day of the month.
Task 4
If you've been paying attention, you'll notice that we've been using dateContext instead of today in our computed properties. We want to keep them separate because we'll be changing the dateContext to update our computed properties when we increment/decrement the month, and if we don't have today then we lose our initial date, which we need to display the current date to the user. So let's use some more computed properties to persist our initial date.
computed: {
    //Previous Code Above
   initialDate: function () {
        var t = this;
        return t.today.get('date');
    },
    initialMonth: function () {
        var t = this;
        return t.today.format('MMMM');
    },
    initialYear: function () {
        var t = this;
        return t.today.format('Y');
    }
}
Here we're just using Moment to format today into its date, month, and year. We'll use these later in the template to highlight today's date.
Task 5
Finally, we're ready to increment and decrement the month to change our calendar's context. Once again, Moment makes this trivially easy for us to do.
methods: {
    addMonth: function () {
        var t = this;
        t.dateContext = moment(t.dateContext).add(1, 'month');
    },
    subtractMonth: function () {
        var t = this;
        t.dateContext = moment(t.dateContext).subtract(1, 'month');
    }
}
As you can see, in both methods we are overwriting the current dateContext with an appropriate addition or subtraction based on the dateContext. And since we made use of dateContext in our computed properties, everything will update to reflect the new month.
The Template
With our data, computed properties, and methods finished, we can now put them to good use in our template.
<template>
    <div class="calendar">
        <div class="calendar-header">
            <i class="fa fa-fw fa-chevron-left" @click="subtractMonth"></i>
            <h4>{{month + ' - ' + year}}</h4>
            <i class="fa fa-fw fa-chevron-right" @click="addMonth"></i>
        </div>
        <ul class="weekdays">
            <li v-for="day in days"></li>
        </ul>
        <ul class="dates">
            <li v-for="blank in firstDayOfMonth"> </li>
            <li v-for="date in daysInMonth"
                :class="{'current-day': date == initialDate && month == initialMonth && year == initialYear}">;
                <span></span>
           </li>
        </ul>
    </div>
</template>
This might look like a lot, but let's break it down step-by-step. At the top, we have our calendar-header. Here we have our month incrementer and decrementer with the month and year in between them. Next we have weekdays, where we're using a v-for to loop through all of the days in our days array. This isn't strictly necessary - you could hardcode it in - but I find that it keeps the template from becoming overwhelming. Finally, we have dates - the meat and potatoes of our calendar. Within the ul we have two different v-fors. The first loops through the firstDayOfMonth so we can get the spacing correct for the actual dates. Then we have another v-for that loops through the daysInMonth to actually display the dates on the page. The last thing to note is our dynamic class current-day. Here we're using the initial dates to ensure that we only add this class when it is the correct day.
Conclusion
There you have it! Your very own Vue.js calendar. Now there are certainly lots of plugins and libraries out there that could have done this for us. But with your own custom component you have the flexibility to add in as many additional features as you need, without carrying the overhead of features you'll never use. Until next time, happy coding!