
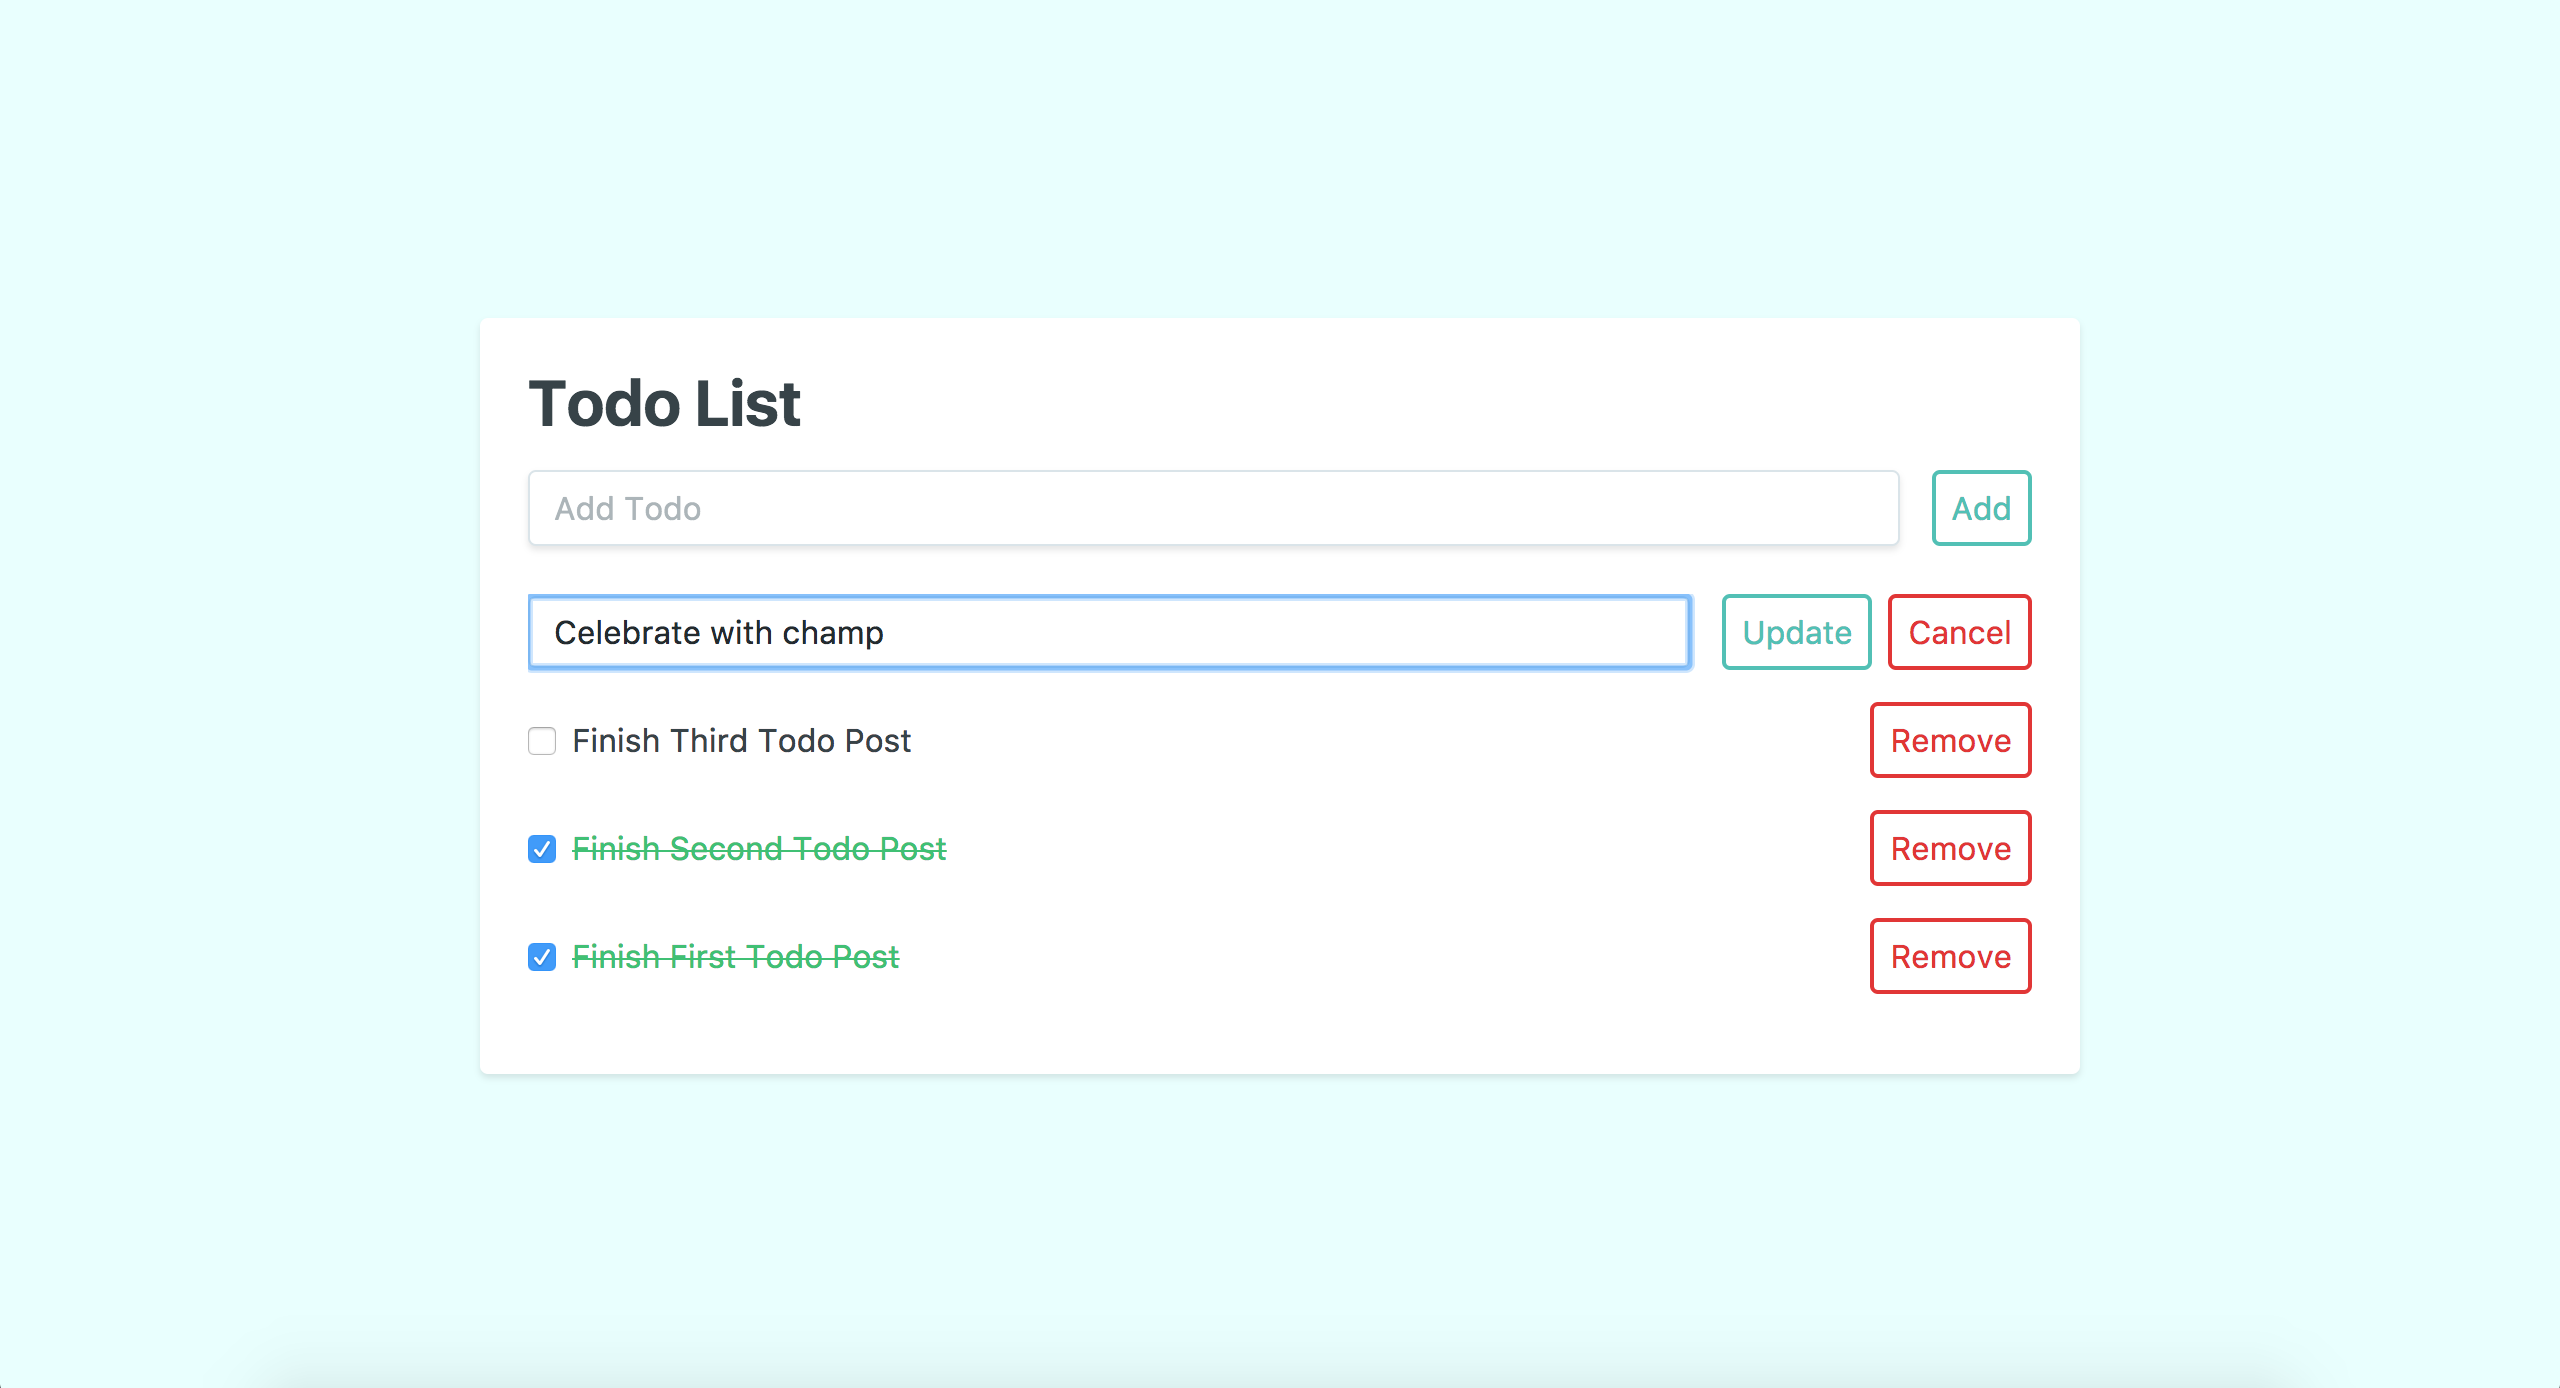
Our little todo app is the gift that keeps on giving. We've already spent the last few blog posts adding some Tailwind CSS styles, setting up a Vue component, and fleshing out a Laravel backend for our todo app, and now it looks like this:
Now that we've put all this work into our app, wouldn't it be great to know if there were any problems or bugs with it? Or, what if we wanted to make some upgrades in the future; wouldn't it be awesome if we knew if our future changes broke our existing functionality?
If you answered yes to any of those questions, then it's time for us to enter the exciting world of testing. Before we get too far ahead of ourselves, let's address the elephant in the room.
Testing gets a bad rap for being this big, scary concept. But, it doesn't have to be! At its most fundamental level, writing a test just lets us know that our code is working as intended. That's it!
Don't worry about the differences between unit, feature, and integration tests. Don't worry about trying to get 100% code-coverage. Don't worry about setting up crazy CI processes. All of that can come much, much later.
To start, we just have to focus our efforts on writing simple tests that help us spot when our code doesn't work.
Now that we're feeling confident, let's see what the big fuss is all about. To follow along with this tutorial, you can download a copy of this project on GitHub.
What To Test
Before we jump into our code, let's take a moment to think about what exactly we need to test. Since our app uses Vue.js and Laravel, we're kind of blending a traditional, server-rendered website with an SPA.
While this may be a common pattern these days, it does make our testing a little trickier. We can't just write Laravel tests, and we can't just write Vue.js tests. Instead, we'll need to do a bit of both to make sure our app is well-tested.
Now, there are a couple of different ways that we can approach this. We could use a tool like Laravel Dusk to browser test our app. But, browser tests can be slow to run, and - in my experience - a bit finicky to maintain.
Instead, let's treat the Laravel side of our app like an API and the Vue side like an SPA. Then we can use Laravel's PHPUnit testing library to feature test our API and Vue Test Utils to test our SPA's functionality.
Set Up
The hardest part of getting started with testing is setting everything up. Fortunately, we're using Laravel which makes it much easier for us to get up and running.
Laravel's Testing Set Up
If you recall when we set up our database, we used MySQL. This is nice for testing because we don't have to set up a dedicated testing database. Instead, we can use an in-memory SQLite database.
To set up our testing database, we just have to open up our phpunit.xml file found in the root of our project. This file should look like this:
<?xml version="1.0" encoding="UTF-8"?>
<phpunit backupGlobals="false"
         backupStaticAttributes="false"
         bootstrap="vendor/autoload.php"
         colors="true"
         convertErrorsToExceptions="true"
         convertNoticesToExceptions="true"
         convertWarningsToExceptions="true"
         processIsolation="false"
         stopOnFailure="false">
    <testsuites>
        <testsuite name="Feature">
            <directory suffix="Test.php">./tests/Feature</directory>
        </testsuite>

        <testsuite name="Unit">
            <directory suffix="Test.php">./tests/Unit</directory>
        </testsuite>
    </testsuites>
    <filter>
        <whitelist processUncoveredFilesFromWhitelist="true">
            <directory suffix=".php">./app</directory>
        </whitelist>
    </filter>
    <php>
        <env name="APP_ENV" value="testing"/>
        <env name="CACHE_DRIVER" value="array"/>
        <env name="SESSION_DRIVER" value="array"/>
        <env name="QUEUE_DRIVER" value="sync"/>
    </php>
</phpunit>
This is the configuration file for our tests. In a nutshell, it allows us to overwrite the configuration variables we've set in our .env with testing-specific variables.
At the bottom of the file, you can see a block of code surronded by <php></php> tags. This is where we can update or add our own testing overrides. So, this is where we'll set up our SQLite database. To do that, we can add the following to that block:
<env name="DB_CONNECTION" value="sqlite"/>
<env name="DB_DATABASE" value=":memory:"/>
Here, we're telling Laravel to use the sqlite database connection instead of mysql, and that our database should just be in-memory instead of a named database.
And there you have it! Now, we can turn our attention to our Vue.js testing set up.
Vue.js's Testing Set Up
In our project, we can leverage Laravel Mix to run our Vue.js test suite. Now, we just need to use Yarn to pull in our testing packages.
Fortunately for us, Jeffery Way has already gone through this process on Laracasts, so we can stand on his shoulders to get set up. Following his instructions, we can run the following command from our terminal to install the necessary packages.
yarn add --dev vue-test-utils mocha mocha-webpack jsdom jsdom-global expect moxios
With all of our necessary packages added, we can head over to the tests directory in the root of our project. In here, we can create a directory called Vue, and in there we can create a setup.js file.
Inside of setup.js, we can add the following:
require('jsdom-global')();

global.expect = require('expect')
global.axios = require('axios');
global.Vue = require('vue');
global.bus = new Vue();
This imports the jsdom-global package for our Vue tests' set up and sets a bunch of global variables that we'll need to interact with. These include our assertion library expect, our AJAX dependency axios, and our global event bus.
Hopping back into the root of our project, we can open up our package.json file to add a new testing script for us to run. At the bottom of the scripts object, we can add the following command:
"scripts": {
    "dev": "npm run development",
    "development": "cross-env NODE_ENV=development node_modules/webpack/bin/webpack.js --progress --hide-modules --config=node_modules/laravel-mix/setup/webpack.config.js",
    "watch": "cross-env NODE_ENV=development node_modules/webpack/bin/webpack.js --watch --progress --hide-modules --config=node_modules/laravel-mix/setup/webpack.config.js",
    "watch-poll": "npm run watch -- --watch-poll",
    "hot": "cross-env NODE_ENV=development node_modules/webpack-dev-server/bin/webpack-dev-server.js --inline --hot --config=node_modules/laravel-mix/setup/webpack.config.js",
    "prod": "npm run production",
    "production": "cross-env NODE_ENV=production node_modules/webpack/bin/webpack.js --no-progress --hide-modules --config=node_modules/laravel-mix/setup/webpack.config.js",
    //New Command Below
    "test-js": "mocha-webpack --webpack-config=node_modules/laravel-mix/setup/webpack.config.js --require tests/Vue/setup.js tests/Vue/**/*.spec.js"
},
Now when we run npm run test-js, we'll run our Vue.js test suite!
It may seem a little overwhelming, but that's all the set up we need to start writing our tests. Now, let's start testing our Laravel API.
Testing Our Laravel API
On the Laravel side of our app, we've defined our API. This is how our frontend interacts with our database to persist and change our data.
In order to test this, we'd like to know if a couple of things. Does our API return the response we expect? If we're changing or storing data, does it persist in the database? And, if we feed it incorrect data, does it return an error that we'd expect? Let's dive in!
In the root of our project, we can see a tests directory. This is where we'll write all of our tests. In here, we can see some setup files and a few directories. For the moment, we only care about the Feature directory.
Now, let's use php artisan to generate our test class in the Feature directory. This is where we'll actually write our tests. To do this, we can just run php artisan make:test TodoTest.
Presto! We now have our Todo Test Class ready to go. Out-of-the-box, our generated test class provides us with a demo test for us to see. It should look like this:
 /**
 * A basic test example.
 *
 * @return void
 */
public function testExample()
{
    $this->assertTrue(true);
}
Nothing too fancy, we're just "asserting" that true is equal to true. Asserting is a word that you'll hear a lot when testing. An assertion is basically what we'd expect from our code. So, in this case, we'd assert that true is equal to true because we'd expect it to be so - or as my Economics Professor liked to tell me, "Nick that is a tautology!" As we write a few more tests, this will get easier to understand.
For our first test, let's start by testing our index() method in our controller. To do that, we can replace our default test with the following:
use RefreshDatabase;

/** @test */
public function can_get_all_the_todos()
{
    //
}
Let's break this down. At the top, we've added the RefreshDatabase trait so our database is instantiated before our test and removed after it's done. Then we added a very descriptive method to describe what we want to test. Now, we're ready to write the actual test.
First things first, we'll need to set up our world. For this test, we're expecting that we'll be able to get all the todos, so we'll need to have some todos, to begin with.
This is where our factories come in handy. We can simply whip up some dummy todos that our API will get for us. So, our method will look like this:
/** @test */
public function can_get_all_the_todos()
{
    $todos = factory('App\Todo', 3)->create();
}
As you can see, we're just creating 3 todos in our database with our factory. Now, we need to call our API, which will look like this:
/** @test */
public function can_get_all_the_todos()
{
    $todos = factory('App\Todo', 3)->create();

    $this->get('/todos');
}
So far so good! We've created our todos and we're calling our API, but now what? It's time for our assertions! So, what do we expect to happen here? Let's look at our controller method to make sure.
//In TodoController.php
public function index()
{
    return response(Todo::latest()->get(), 200);
}
Looking at our code, we're expecting that our API will return a 200 status code and that it will have all of our Todos. So, for our test, we should assert that the status is equal to 200 and that the response data matches our factory data.
/** @test */
public function can_get_all_the_todos()
{
    $todos = factory('App\Todo', 3)->create();

    $this->get('/todos')
        ->assertStatus(200)
        ->assertJson($todos->toArray());
}
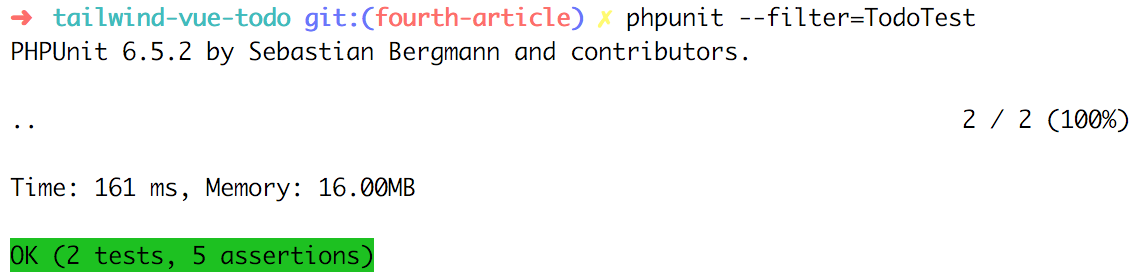
Now, we're asserting our expectations! Let's run this test to see if it passes. To do that, we can hop into our command line and run phpunit --filter=TodoTest.
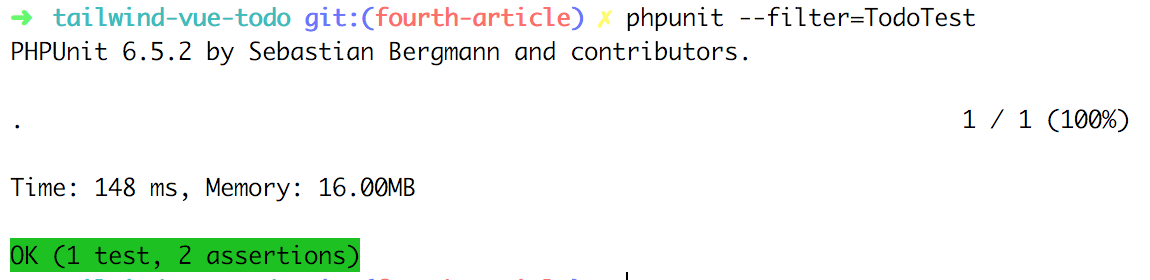
Our test passes! Just for a sanity-check, try making the code fail on purpose and make sure you still don't get green. For example, if you replace the query in your controller method with an array, you can see that the test fails because the data doesn't contain the todos.
Now that we've tested our ability to get all of the todos, let's test creating a todo. So, we can create a new test right below our first one.
/** @test */
public function can_create_a_todo()
{
    //
}
Again, we'll need to create some dummy data for us to use.
/** @test */
public function can_create_a_todo()
{
    $todo = factory('App\Todo')->make()->toArray();
}
This time, we only need one todo and we don't want to save it to the database yet. So, we don't pass in any number to factory() and we use ->make() instead of ->create().
Now for our test, we'll want to assert that the response is what we expect. But, we'll also want to check that our todo was added to the database. So, our assertions will look like this:
/** @test */
public function can_create_a_todo()
{
    $todo = factory('App\Todo')->make()->toArray();

    $this->post('/todos', $todo)
        ->assertStatus(201)
        ->assertJson($todo);

    $this->assertDatabaseHas('todos', $todo);
}
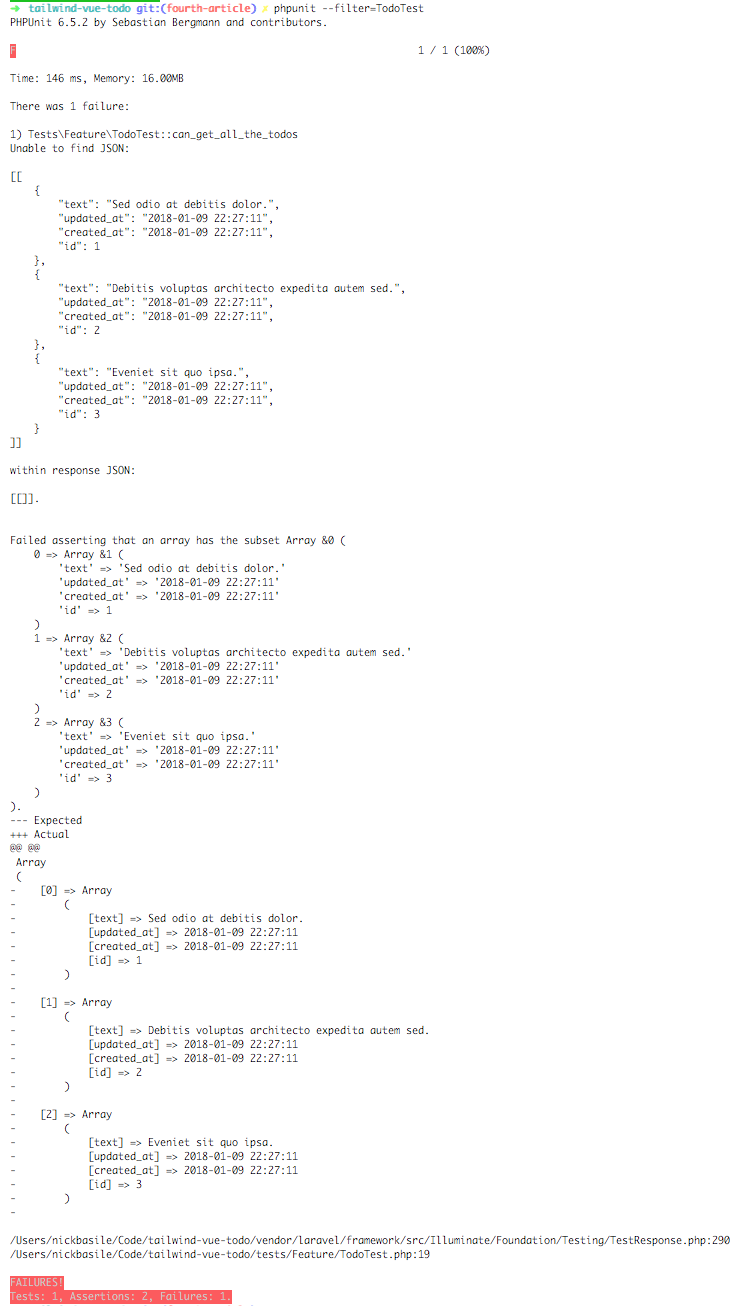
With our assertions set up, let's run our test.
Uh oh, what happened? It looks like we received a 302 response instead of our expected 200 response. A 302 usually corresponds with validation, so maybe we're not passing in the right data. Let's look at our controller method and factory.
//Controller method in TodoController.php
public function store(Request $request)
{
    $data = $request->validate([
        'text' => 'required',
        'finished' => 'required|boolean',
    ]);

    $todo = Todo::create($data);

    return response($todo, 201);
}

//Factory in TodoFactory.php
$factory->define(App\Todo::class, function (Faker $faker) {
    return [
        'text' => $faker->sentence,
    ];
});
There's the problem! Our controller method is expecting our todo to have it's finished property set, but our factory doesn't have that. Let's update our factory to include that:
$factory->define(App\Todo::class, function (Faker $faker) {
    return [
        'text' => $faker->sentence,
        'finished' => false,
    ];
});
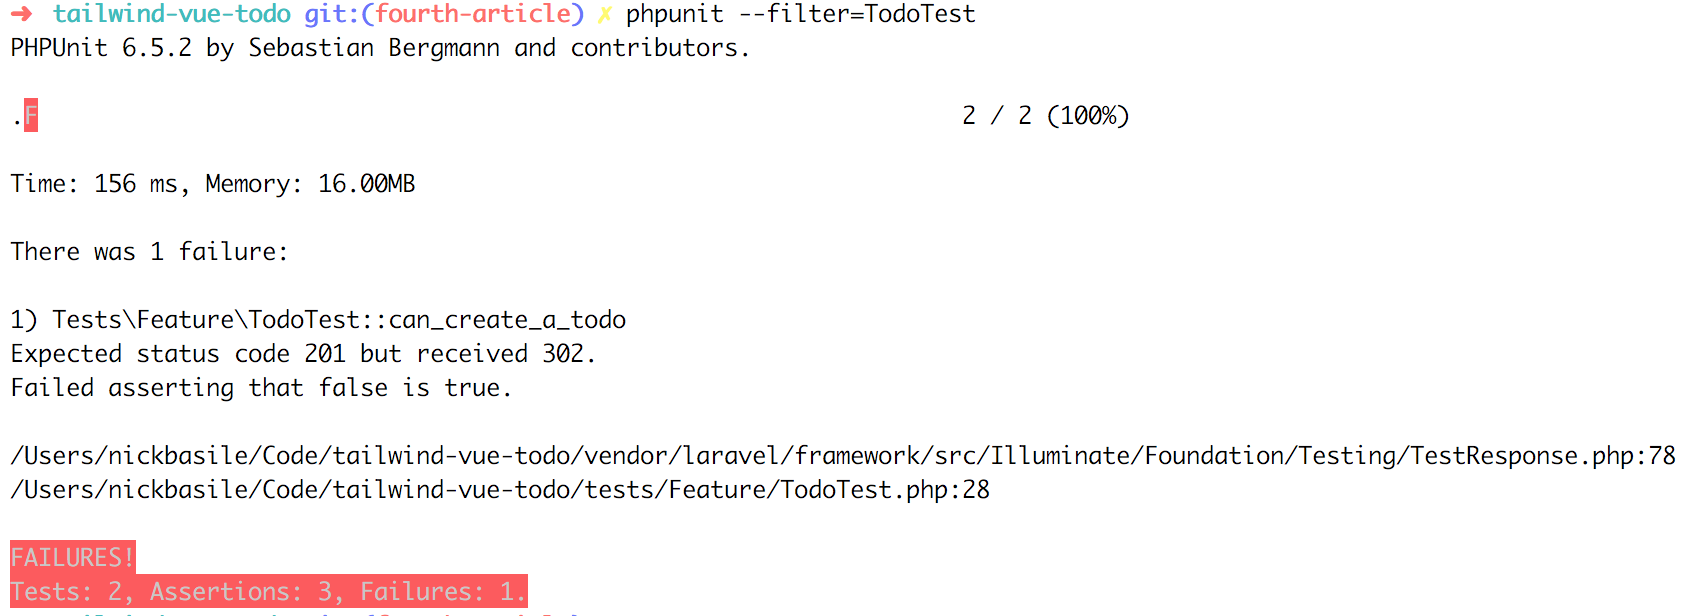
Now when we run our tests, we should get green.
And sure enough, we do! That just goes to show us how valuable tests can be - they help us spot issues with our code that are easy to miss. This also shows us how important it is to test what happens when things aren't perfect. Let's write a quick test now to make sure we get a 302 when we pass that route incorrect data.
/** @test */
public function can_get_a_validation_error_when_trying_to_create_an_empty_todo()
{
    $this->post('/todos', [])
        ->assertStatus(302);
}
Now we're sure that we'll get an error when we try and create a todo without any data.
As we've walked through these tests, I hope that you're starting to see how quick and easy it is to write them. We certainly have more functionality here to test, but I'll leave that as an exercise to you.
If you do get stuck, be sure to check out the repo for some guidance. But, I'm sure that you can do it! Now, let's move on to our Vue.js tests.
Testing Our Vue.js SPA Frontend
Let's start by creating a TodoList.spec.js file in our tests/Vue directory. This is where we'll be writing our Vue.js tests.
At the top of this file, we'll need to import some of the packages that we installed earlier.
import { shallow, mount } from 'vue-test-utils';
import expect from 'expect';
import TodoList from '../../resources/assets/js/components/todo-list.vue';
import moxios from 'moxios'
We start by importing our wrapper methods from vue-test-utils. These methods let us spin up and interact with our Vue components in the testing environment. Next, we have expect, which we'll be using to make our assertions. Then, we have our TodoList component, so we can actually test it! And finally, we're importing the moxios package to help us mock our API calls.
Now, we're ready to start writing our test suite. All of the tests we're writing will live inside a describe block. We can add one right below our imports, like this:
describe('TodoList', () => {
    //Tests go here
});
Now, in order to use moxios, we need to install and uninstall it between each test. Fortunately, we don't have to write that for every test. We can just hook in the beforeEach() and afterEach() calls.
describe('TodoList', () => {
    beforeEach(() => {
        moxios.install(axios);
    });

    afterEach(() => {
        moxios.uninstall(axios);
    });
});
Here, we have to make sure that we pass in the axios environment that we initialized earlier in our setup.js file. Now we're ready to write our first test!
Let's start with something simple: when the component is rendered, it should say Todo List. So, right below our afterEach hook, we can write:
it('renders the correct title on the page', () => {

});
This is our test, similar to the PHPUnit methods we saw earlier. Now, let's add our component in.
it('renders the correct title on the page', () => {
    let wrapper = shallow(TodoList);

});
Here, we're using the shallow() method to create out component. shallow() is different from mount() because it'll generate "stubbed out" or dummy versions of all that component's child components. In this test, we don't really care about the TodoItems just yet, so we can use shallow(). Now, let's make an assertion!
it('renders the correct title on the page', () => {
    let wrapper = shallow(TodoList);

    expect(wrapper.html()).toContain('Todo List');
});
Here, we're just expecting our component's HTML to contain the text "Todo List". How simple is that? Let's see if we get green now when we run our tests using the command we defined earlier: npm run test-js.
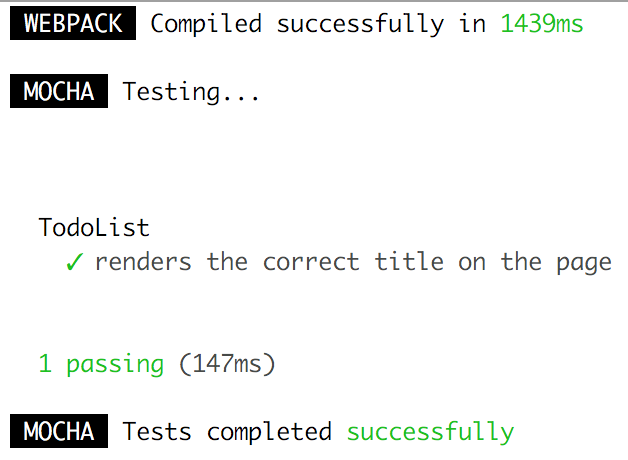
Bada bing bada boom, we've got ourselves a passing test! Let's write one more together to test that our component renders correctly when it has todos. To start, we'll define our test once again.
it('shows the todos fetched from the api', (done) => {

})
This time, notice that we're passing in done to the method. This is because we'll be making an axios call which is asynchronous. Because of that, we'll need to manually tell our test suite when the test is over. Otherwise, we'll always get green even though our test might be failing.
Now let's go ahead and mount our component again.
it('shows the todos fetched from the api', (done) => {
    let wrapper = mount(TodoList);
})
This time, notice that we're using mount() instead of shallow() because we want to see the child component rendered on the page. Now, we can use moxios to stub out the response that our axios call is expecting.
it('shows the todos fetched from the api', (done) => {
    let wrapper = mount(TodoList);

    moxios.stubRequest('/todos', {
      status: 200,
      response: [
          {
            id: 1,
            text: "Bingo",
            finished: false,
            created_at: "2018-01-10 00:00:00",
            updated_at: "2018-01-10 00:00:00",
          }
      ],
    });
})
If you recall, when our TodoList component is created it goes out and fetches all of the todos we have from our API. Here, our component is receiving the data from moxios instead of trying to hit our API.
There are some pros and cons to this approach, but I think it gets us up and running pretty quickly. Now we need to make our assertion.
it('shows the todos fetched from the api', (done) => {
    let wrapper = mount(TodoList);

    moxios.stubRequest('/todos', {
      status: 200,
      response: [
          {
            id: 1,
            text: "Bingo",
            finished: false,
            created_at: "2018-01-10 00:00:00",
            updated_at: "2018-01-10 00:00:00",
          }
      ],
    });

    moxios.wait(() => {
      expect(wrapper.html()).toContain('Bingo');
      done();
    });
})
Once again, we're doing things a little differently than before. First off, we've wrapped our assertion in a moxios.wait() method. Since moxios is actually simulating a response in our stub, we need to wait for it to finish before we can make our assertion. If we tried to run our test without it, then it would fail every time because we'd be making the assertion before we had the correct data in place.
Inside of there, the actual assertion itself should look pretty familiar. It's essentially the same thing we did before. Finally, you'll notice the done() method right after it. Here, we're letting our test suite know that the test is finished and we're ready to move on.
Let's run our tests and see what we get.
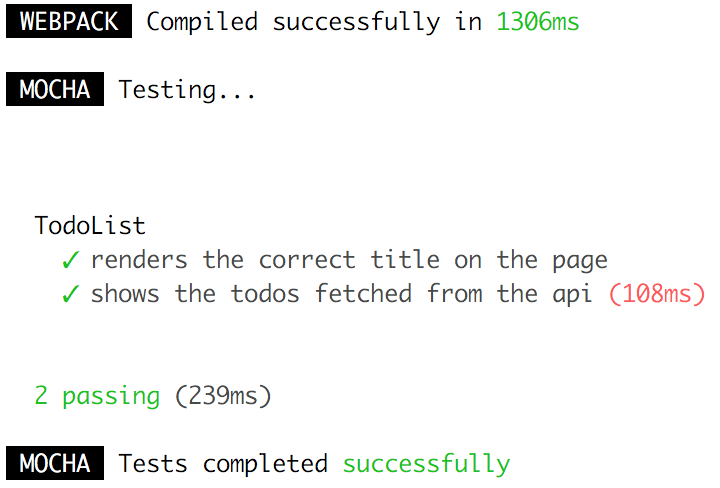
Look at that! Our tests are passing and we're starting to get the hang of this whole testing thing. Now that we've walked through some examples, I'll leave the rest of the tests to you. But don't worry too much, if you get a little stuck you can always check out the repo.
The Wrap-Up
Well, we certainly covered a lot here today. We walked through how to get ourselves set up with Laravel and Vue.js tests, and then we tested our API and Vue.js component! At this point, I'd reckon that you're ready to dive head-first into the world of testing.
If you're looking for some more testing tutorials, I highly recommend Jeffery Way's Build a Forum with Laravel and TDD series and his Testing Vue.js one. Both of those series certainly influenced this post today, so thank you Jeffery for all the amazing work that you do! As always, feel free to ask me any questions on Twitter. And until next time, happy coding!